Triggering builds in Jenkins
Besides executing jobs on-demand through the Jenkins UI, sometimes we need to be able to start a job without manual intervention depending on some events occurred in our development pipeline. This is enabled in Jenkins by means of build triggers.
This feature allows to run our Jenkins jobs from external systems like SCM tools, batch processes, etc.
In this post I will show you how to setup a build trigger both in FreeStyle and Pipeline jobs. In addition, I will also showcase a typical use case consisting in triggering a Job when a code change is detected. In this case we will use a git repository hosted in GitLab CE.
Build triggers
We can consider these three main build triggers:
-
To start a build remotely
-
To start a build upon other build completion (build chaining)
-
To schedule a periodic build
-
To start a build due to SCM changes
First I will configure the first three types in a Freestyle and Pipeline project and then I will show you how to setup the fourth one as an integration example with GitLab
Freestyle project
If you create a Freestyle project you can find Build trigger section in the third configuration block just below Source Code Management
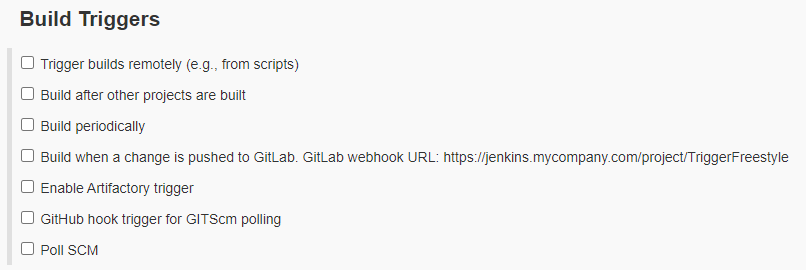
Start build remotely
Any Job can be triggered remotely without special configuration whenever you provide user credentials with read/build permissions for the job.
To trigger a job build, a HTTP POST request to the following URL is required:
<JENKINS BASE URL>/job/<Job Name>/buildAs you can guess, this URL is secured and you will need valid credentials to make it work.
It is considered a best practice to create a specific user with view/build permissions on the job and associate an API key to the user instead of using the password directly
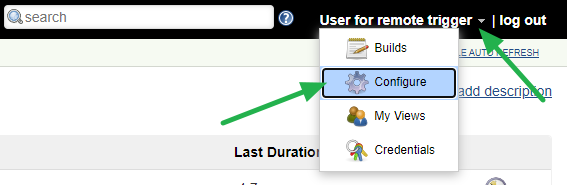
You can create an user through Manage Jenkins → Manage Users → Create User
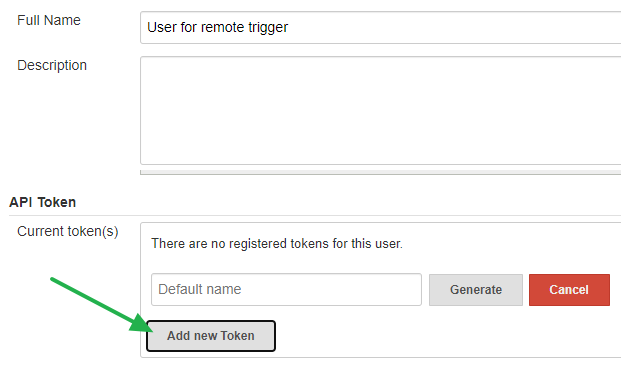
Once the user is created you need to associate an API token, for which you need to log in with the user and select Configure in the user context menu accessible in the upper right corner
In the user form loaded you only have to click on Add new token button and enter it manually or using the Generate button
In the probably case you have some authorization scheme setup in Jenkins you will need to grant the user the view / build permission.
In my case I have setup the Role-Based Authorization Strategy plugin (highly recommended BTW) so I log back with an admin user and access to Manage Jenkins → Global security → Manage and Assign Roles → Manage Roles
In the Global roles table Read and Build permissions are granted to user username at Job level

That’s all. Now you will be able to trigger the job remotely from any script or application through a simple HTTP POST request. You can find an example below using curl
curl -X POST http://<user>:<API key>@<JENKINS BASE URL>/job/<job name>/build| If your Jenkins version is below 2.96 you will have to disable CSRF (not recommended) or include a crumb parameter in the request. |
| You can notice a checkbox with the option "Trigger builds remotely" that allows you to enter an authentication token. This token is deprecated and it is more secure to use user credentials than a hard coded token. |
Build chaining
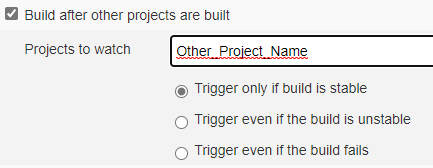
In this case the configuration is straightforward. You only need to check the option Build after other projects are built and enter an existing job name in Projects to watch
By default the build is triggered only if the watched build is successful, but you can also trigger it for unstable or failed build selecting the radio button accordingly
Periodic build
If you need to periodically trigger the build, Jenkins provide a very easy and flexible way to do it thanks to the cron-like feature
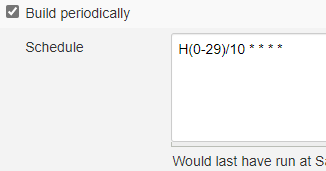
The syntax is basically like the Linux cron with the following added features:
-
Possibility of generating even job loads using H symbol, that is a value generated from the job name that will be different between jobs to get them executed at slightly different times using the same cron expression
-
Predefined aliases using the H feature underneath (@yearly, @annually, @monthly, @weekly, @daily, @midnight, and @hourly)
-
Set the time zone for the cron expressions using TZ=<Timezone identifier> at the beginning of the script
A complete syntax reference is provided clicking on the help button next to the Schedule text area.
It is worth highlighting that you can set up multiple schedule definitions, one per line.
Pipeline project
As I have highlighted in previous posts, nowadays the preferred way to create jobs in Jenkins is through pipelines due to the advantages of handling all the configuration under a source control repository.
In this case the same features and configurations options I have just described for Freestyle projects apply for Pipelines.
You can find below some examples in declarative syntax
| No specific pipeline code is required to enable a pipeline job to be triggered remotely beyond using valid user credentials and the same HTTP request detailed in the Freestyle section. |
 1
 2
 3
 4
 5
 6
 7
 8
 9
10
11
12
13
pipeline {
   agent any
   triggers {
      upstream(upstreamProjects: 'Test_email', threshold: hudson.model.Result.FAILURE)  (1)
   }
   stages {
      stage('Hello') {
         steps {
            echo 'Hello World'
         }
      }
   }
}
| 1 | Build will be triggered after Text_email_ext project is built regardless of its build result |
 1
 2
 3
 4
 5
 6
 7
 8
 9
10
11
12
13
pipeline {
   agent any
   triggers {
        cron('H/2 * * * * \n @midnight')   (1)
   }
   stages {
      stage('Hello') {
         steps {
            echo 'Hello World'
         }
      }
   }
}
| 1 | Define multiple cron expressions with newline separator (\n) |
| Please note that unlike Freestyle project, Pipelines containing triggers need to be be executed once manually so that the triggers are created. |
GitLab integration example
One of the main use cases for using build triggers is to get a fast feedback loop that will help you to follow the Continuous Integration development practice.
Basically, you definitely want to know as soon as possible when you push a breaking change into your code base to be able to fix it with the lowest cost in effort and time.
Assuming that developers are pushing changes frequently (at least once a day) and you have setup an automatic and reliable unit test suite that runs automatically along with the build process, you only need this build to be run as soon as a change is committed into the repository to get notified if any unit test is failing.
The most basic approach is using a pull strategy consisting in periodically polling the SCM to know if there has been new changes and in such case run the build. The problem here is that polling is a costly operation and it is not the best suited for fast feedback loops because of the short interval required to be executed.
The alternative is using a push strategy. This approach consists in delegating the responsibility of letting us know when a change is committed to the SCM through the use of webhooks.
Once we know the basics of build triggers in Jenkins I will show you how to setup a build trigger that will allow us to get a job triggered whenever a code change is pushed or merged in a source code repository.
For this example we will be using a Git repo hosted in Gitlab CE and the Gitlab Jenkins plugin for the integration.
Jenkins configuration
First step is to install the Gitlab plugin
Freestyle project
In the case of a Freestyle project, when you access to the Build trigger configuration section you will see a new option to trigger a build when a change is pushed to GitLab
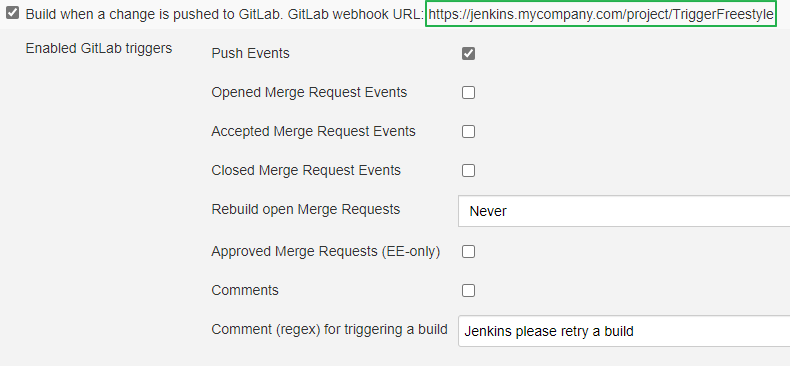
Next to this new option you can find the webhook endpoint (boxed in green) where GitLab will notify when a new change is detected in the git repository.
As you can see you can enable which GitLab events will trigger the build. According to the configuration showed above, only push/merge events will trigger it.
You can find information on the basic and advanced configuration options in the plugin documentation
Let’s say we have a job that we want to trigger both manually and automatically from Gitlab. For that purpose we will add a build parameter to choose the git branch built by the job using the Git parameter plugin.
To add the parameter you have to check the option This project is parameterized in the first configuration section of the project.
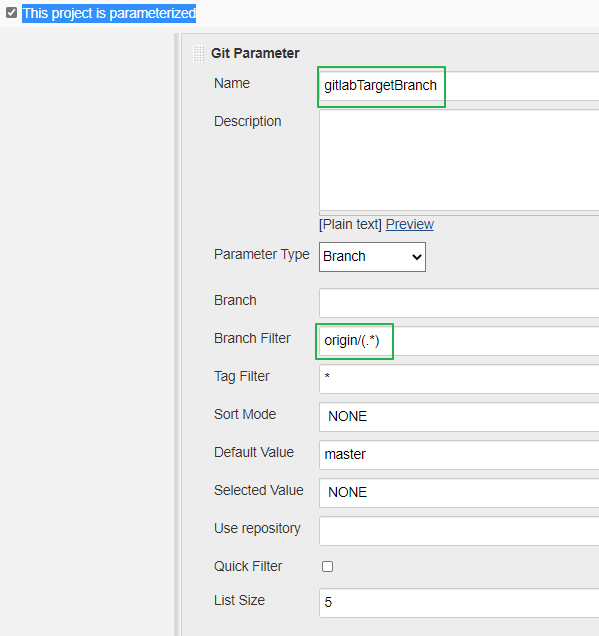
Parameters boxed in green are worth of some elaboration:
-
Name: this is the environment variable name where the chosen branch name is stored. I have set it to gitlabTargetBranch because it is the same name that the GitLab plugin will use to store the branch name where a change was detected. We want to keep the same name for the build to work both for manual and triggered runs.
-
Branch filter: the branch name set by the GitLab plugin doesn’t include the remote repository name (normally origin) so we want it also to be excluded from the variable name when the branch is selected by the user in case of running it manually. The pattern origin/(.*) will exclude origin/ in the stored variable value.
Pipeline project
The Jenkinsfile file content for the equivalent Pipeline project with the same configuration would be something like the following:
 1
 2
 3
 4
 5
 6
 7
 8
 9
10
11
12
13
14
15
16
17
18
19
20
21
22
23
24
25
26
27
28
properties([
    parameters([
        gitParameter(branch: '',
                     branchFilter: 'origin/(.*)',
                     defaultValue: 'master',
                     description: '',
                     name: 'gitlabTargetBranch',
                     quickFilterEnabled: false,
                     selectedValue: 'NONE',
                     sortMode: 'NONE',
                     tagFilter: '*',
                     type: 'PT_BRANCH')    (1)
    ])
])

pipeline {
   agent any
   triggers {
      gitlab(triggerOnPush: true, triggerOnMergeRequest: false, triggerOnNoteRequest: false, branchFilterType: 'All')    (2)
   }
   stages {
      stage('Hello') {
         steps {
            sh 'echo Trigger build for branch: origin/$gitlabTargetBranch'    (3)
         }
      }
   }
}
| 1 | Configure a git parameter to allow the user to choose the branch to build |
| 2 | Enable the webhook endpoint to allow the build to be trigger by GitLab |
| 3 | Shows the branch to build for both manual and triggered builds |
GitLab configuration
Configuration in GitLab is pretty straightforward.
Once logged into GitLab you have to select the repository you want to setup and access to the webhooks configuration screen located in Settings → Integrations
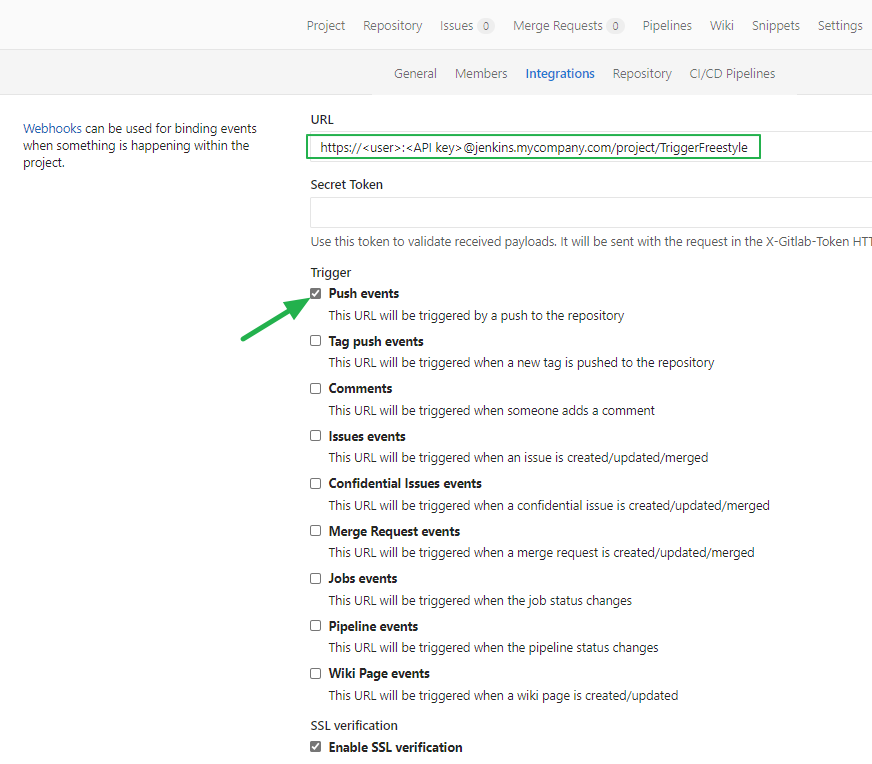
| The screenshot is from GitLab CE version 9 which is pretty old so the UI could be slightly different in current versions. |
The URL to use is the one showed in the Freestyle configuration image. Note that you have to add an username and its corresponding API key with job build permissions.
In this case, the webhook will be triggered if you push or merge some changes to any branch.
Testing the webhook
Once configuration is complete the only thing left is to test it.
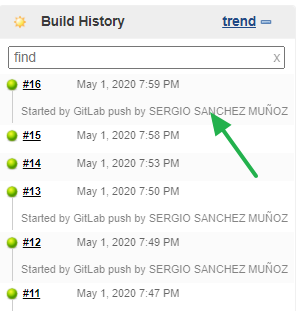
If we push a change into the git repository while looking at the Build History in the Jenkins project view, we should spot in a few seconds a new build run showing the user who made the change
That’s all folks!
Thanks for reading. Feedback and suggestions are very welcome.