Scripted vs. Declarative Pipelines in Jenkins
Pipelines in Jenkins
When Jenkins 2 was released, the main feature introduced was the possibility of creating jobs as code using a DSL. This functionality is known as "Pipeline as code" and it is supported by all relevant CI tools nowadays.
The main advantages of Pipelines as code are:
-
Creating Pipelines by coding instead of configuring it through the UI of a CI/CD tool
-
Tracking changes in a Version Control System (VCS)
-
Easy update of a Pipeline by committing changes into a VCS
-
Flexibility provided by code
When I tried to create my first Pipeline in Jenkins I looked for examples in the Web and I felt a bit confused at the beginning. There were subtle differences in structure and code that I didn’t understand. Later I learned that those differences were related to the two different flavors of Pipelines available in Jenkins: Scripted and Declarative.
In this post I want to make a summary of the differences between them, pros and cons, and in which case you should use one rather than the other.
Scripted vs. Declarative
The best way to explain the differences is using an example, so you can find below a Pipeline in Scripted syntax and just after it the same version but translated to Declarative syntax.
|
Note the callouts numbers as I will use them to explain the main differences. |
 1
 2
 3
 4
 5
 6
 7
 8
 9
10
11
12
13
14
15
16
17
18
19
20
21
22
23
24
25
26
27
28
29
30
31
32
33
34
35
36
37
38
39
40
41
42
43
44
45
properties([
    parameters([                                       (1)
        gitParameter(branch: '',
                     branchFilter: 'origin/(.*)',
                     defaultValue: 'master',
                     description: '',
                     name: 'BRANCH',
                     quickFilterEnabled: false,
                     selectedValue: 'NONE',
                     sortMode: 'NONE',
                     tagFilter: '*',
                     type: 'PT_BRANCH')
    ])
])

def SERVER_ID="artifactory"                            (2)

node {                                                 (3)
    stage("Checkout") {
        git branch: "${params.BRANCH}", url: 'https://github.com/sergiosamu/blog-pipelines.git'
    }
    stage("Build") {
        try {                                          (4)
            withMaven(maven: "Maven363") {
                sh "mvn package"
            }
        } catch (error) {
            currentBuild.result='UNSTABLE'
        }
    }
    stage("Publish artifact") {
        def server = Artifactory.server "$SERVER_ID"   (5)

        def uploadSpec = """{
          "files": [
            {
              "pattern": "target/blog-pipelines*.jar",
              "target": "libs-snapshot-local/com/sergiosanchez/pipelines/"
            }
         ]
        }"""

        server.upload(uploadSpec)
    }
}
| 1 | Input parameters as defined in the properties section |
| 2 | Variables are defined in Groovy language |
| 3 | The first element of a Scripted Pipeline is node |
| 4 | Error control is managed with a try/catch clause in Groovy Syntax |
| 5 | Artifactory configuration is defined through variables |
 1
 2
 3
 4
 5
 6
 7
 8
 9
10
11
12
13
14
15
16
17
18
19
20
21
22
23
24
25
26
27
28
29
30
31
32
33
34
35
36
37
38
39
40
41
42
43
44
45
46
47
48
49
50
51
52
53
54
properties([
    parameters([                                       (1)
        gitParameter(branch: '',
                     branchFilter: 'origin/(.*)',
                     defaultValue: 'master',
                     description: '',
                     name: 'BRANCH',
                     quickFilterEnabled: false,
                     selectedValue: 'NONE',
                     sortMode: 'NONE',
                     tagFilter: '*',
                     type: 'PT_BRANCH')
    ])
])

pipeline {                                             (2)
    agent any

    environment {                                      (3)
        SERVER_ID = 'artifactory'
    }

    stages {
        stage("Checkout") {
            steps {
                git branch: "${params.BRANCH}", url: 'https://github.com/sergiosamu/blog-pipelines.git'
            }
        }
        stage("Build") {
            steps {
                warnError("Fallo pruebas unitarias") { (4)
                    withMaven(maven: "Maven363") {
                        sh "mvn package"
                    }
                }
            }
        }
        stage("Publish artifact") {
            steps {
                rtUpload (                             (5)
                    serverId: "$SERVER_ID",
                    spec: '''{
                          "files": [
                            {
                              "pattern": "target/blog-pipelines*.jar",
                              "target": "libs-snapshot-local/com/sergiosanchez/pipelines/"
                            }
                         ]
                    }'''
                )
            }
        }
    }
}
| 1 | Input parameters are defined in the same way as the Scripted Pipeline because the properties section is outside the Pipeline main structure |
| 2 | The first element of a Scripted Pipeline is pipeline. This is the best way to identify a Declarative Pipeline |
| 3 | Variables are defined in the Environments section. No Groovy-like variable declaration are allowed in Declarative syntax. |
| 4 | Try/catch structure is not allowed like any other Groovy syntax. The custom step warnError is used to manage build state |
| 5 | Artifactory plugin provides a step to easily upload an artifact without requiring Groovy code. |
You can find both scripts as Jenkinsfile(s) in Github
Which one to choose?
I’ll share with you my thoughts on this, but as you know, it depends on each other’s context and project, so my advices may not be applicable to you.
First of all, the Declarative approach is the modern way of developing Pipelines and where Cloudbees, the company behind Jenkins, is putting more effort to evolve. In fact, the newest UI (Blue Ocean) is optimized and work best with Declarative Pipelines.
On the other hand, the Scripted syntax is more flexible since it is powered by the Groovy language and it can provide an easier way to implement Pipelines with complex logic. This can be a downside as well because you can rapidly find yourself fighting with hard to read and maintain Pipelines.
Although Declarative Pipelines are less flexible, they are more structured and readable. In addition, you can overcome their limitations when it comes to creating complex Pipelines by using a couple of approaches:
-
Using a script step that allows you to embed Scripted syntax in a Declarative Pipeline. However, while this can be used as a temporary workaround or quick fix, it is not the recommended approach.
-
Using shared libraries which is an utility that Jenkins provides to encapsulate and reuse common code among different Pipelines. These libraries are developed in Groovy language and can be easily invoked from Pipelines.
In my opinion, if you are already working with Scripted Pipelines and they work fine, I wouldn’t invest any effort in migrating them to Declarative ones (there is probably more to lose than to gain). However, for brand new Pipelines, I suggest trying with Declarative syntax and Shared libraries combo if possible.
Finally, I would like to sum up pros and cons for both approaches in the tables below to help you decide which style could fit better with your use case
| Pros | Cons |
|---|---|
Flexibility powered by Groovy language Extensibility Allows restarting from specific Stage |
Shallow learning curve Less readability harder to maintain Harder to maintain No integration with Blue Ocean Restart from Stage option unavailable |
| Pros | Cons |
|---|---|
Modern way of developing Pipelines and favored by the company behind Jenkins Structured. Simpler syntax Easy to read Steep learning curve Best integration with Blue Ocean interface Allows restarting from specific stage |
Less suitable for Pipelines with complex logic Lack of compatibility with old plugins Restrictive syntax |
Running the examples
In case you are interested in running the Pipelines provided in this post, you will need a Jenkins 2 instance (I used version 2.204.2) and the following plugins installed:
-
Git parameter: in order to create the parameter to choose the git branch to run the Pipeline on.
-
Maven Integration: provides direct integration with maven through the withMaven step
-
Artifactory: for the integration with the repository manager
In addition, for the Publish artifact stage to work, you will need a target Artifactory instance running. It can be easily setup by any of these ways:
-
Cloud instance (14-day trial)
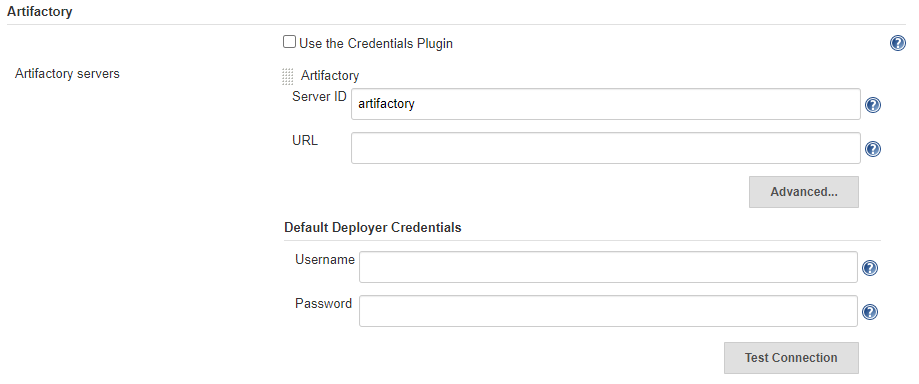
Once the instance is ready you have to set it up in Jenkins with the name of artifactory and the corresponding URL and credentials to allow Jenkins to upload artifacts.
This is done in the Artifactory section within Jenkins → Manage Jenkins → Configure System (see image below):